vue双向绑定原理
本文的双向绑定是简版的vue实现方式,不包含虚拟dom的实现等
原理图: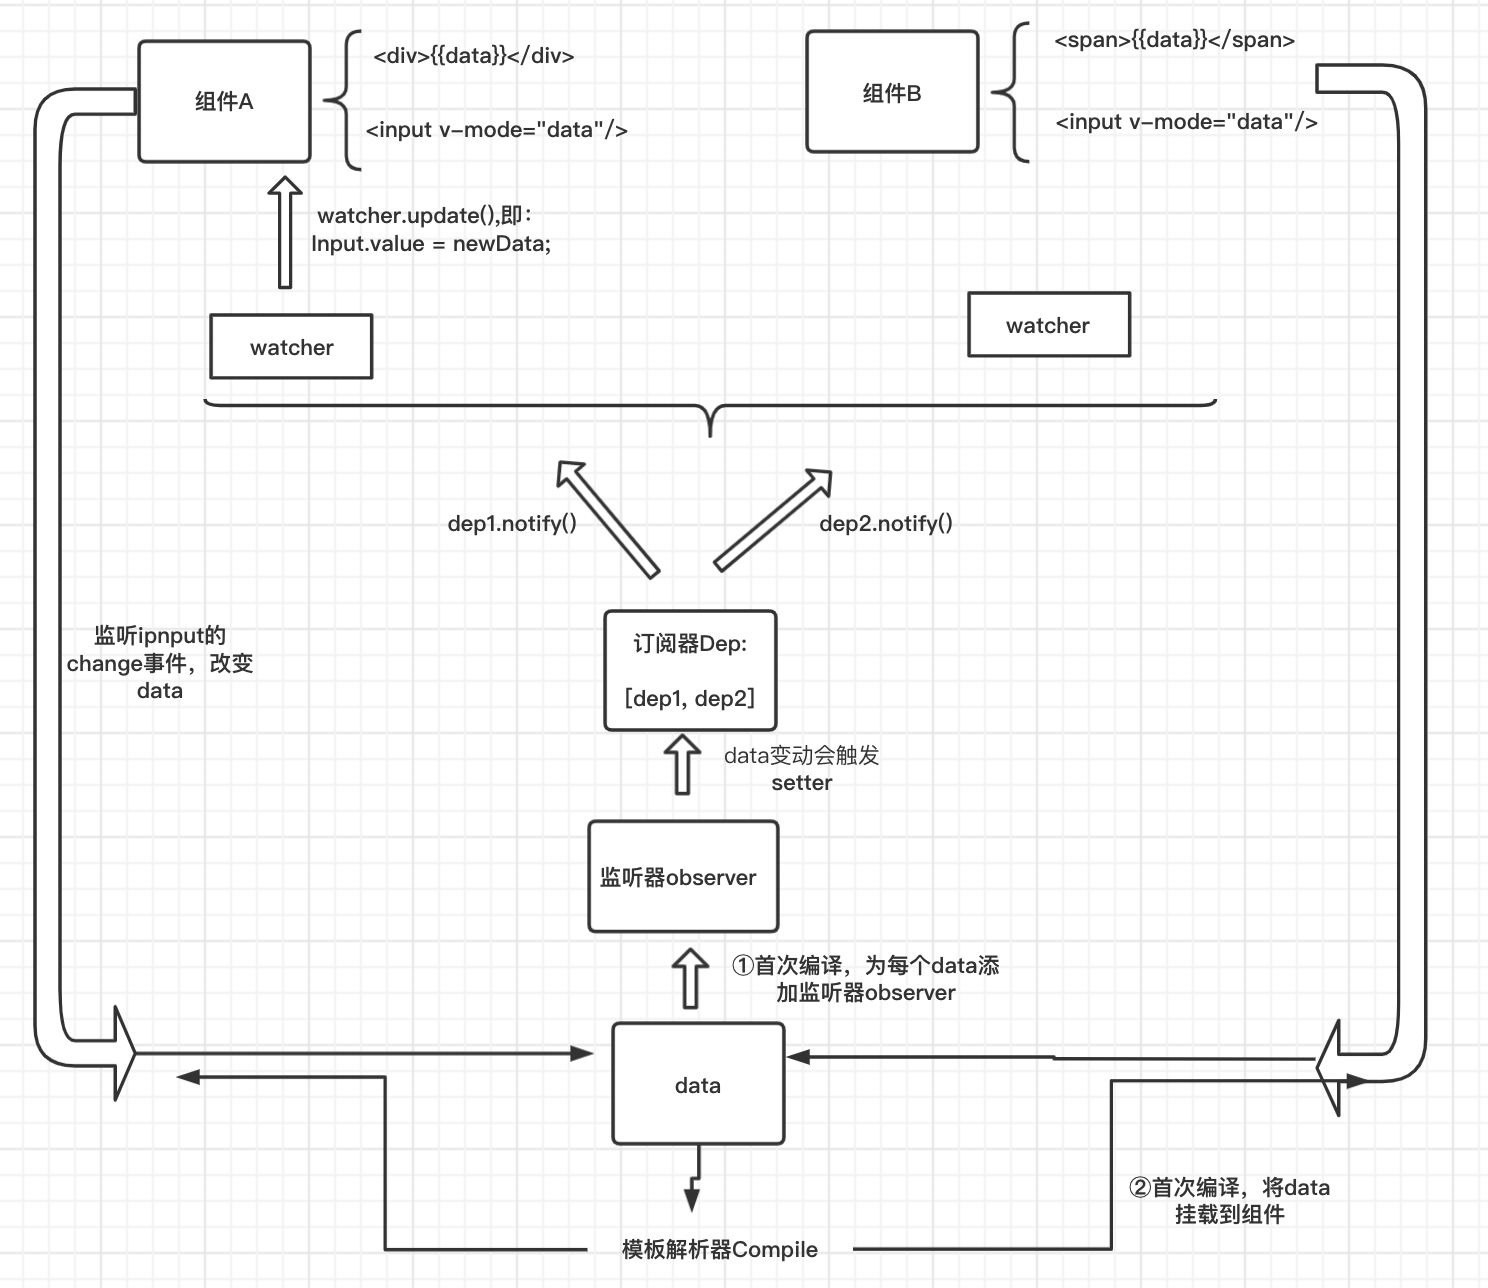
实现:
我们要实现的是将如下代码,最终渲染成dom节点
1 | <div id="app"> |
1 | var vm = new Vue({ |
1.Vue构造函数的实现
可以通过如下3大步来完成dom的渲染:
- 添加监听器
- 遍历dom,编译模板
- 编译完成后,将dom插入到根节点
1
2
3
4
5
6
7
8
9
10
11
12
13function Vue (options) {
this.data = options.data;
var data = this.data;
// 1.添加监听器
observe(data, this);
var id = options.el;
// 2.遍历dom,编译模板
var dom = nodeToFragment(document.getElementById(id), this);
// 3.编译完成后,将 dom 插入到根节点
document.getElementById(id).appendChild(dom);
}
2.使用observe,监听data
observe方法会枚举每一个data,利用Object.defineProperty将data中的数据全部转换成getter/setter,当有新值赋给data,就会触发setter函数,然后通知订阅器Dep有更新
1 | function observe (obj, vm) { |
3.订阅器Dep(依赖收集器)
每个data都拥有一个订阅器Dep,Dep里面装着很多订阅者Watcher,当订阅器Dep收到data值改变的消息,就会通知所有watcher做更新
1 | function Dep () { |
4.订阅者Watcher
watcher和使用该data的dom相关联,通过this可以访问该dom节点,所以可以通过watcher修改dom的文本属性,如,input组件:this.value = newData, 文本组件this.nodeValue = newData;当订阅器Dep收到data变化,就会通知里面的每一个watch改变dom值
1 | function Watcher (vm, node, name, nodeType) { |
4.模板解析器Compile
遍历所有dom,分别处理有v-model属性的元素节点和双花括号的文本节点:
- 将
data值赋值给元素节点,如input赋值 - 替换文本节点的
双花括号 - 为元素节点如
input添加change事件,当value值改变时,更新被关联的data(此时双向绑定之一的view-->model已完成)1
2
3
4
5
6
7
8
9
10
11
12
13
14
15
16
17
18
19
20
21
22
23
24
25
26
27
28
29
30
31
32
33
34
35
36
37
38
39
40
41
42
43
44
45
46function nodeToFragment (node, vm) {
var flag = document.createDocumentFragment();
var child;
// 许多同学反应看不懂这一段,这里有必要解释一下
// 首先,所有表达式必然会返回一个值,赋值表达式亦不例外
// 理解了上面这一点,就能理解 while (child = node.firstChild) 这种用法
// 其次,appendChild 方法有个隐蔽的地方,就是调用以后 child 会从原来 DOM 中移除
// 所以,第二次循环时,node.firstChild 已经不再是之前的第一个子元素了
while (child = node.firstChild) {
compile(child, vm);
flag.appendChild(child); // 将子节点劫持到文档片段中
}
return flag
}
function compile (node, vm) {
var reg = /\{\{(.*)\}\}/;
// 节点类型为元素
if (node.nodeType === 1) {
var attr = node.attributes;
// 解析属性
for (var i = 0; i < attr.length; i++) {
if (attr[i].nodeName == 'v-model') {
var name = attr[i].nodeValue; // 获取 v-model 绑定的属性名
node.addEventListener('input', function (e) {
// 给相应的 data 属性赋值,进而触发该属性的 set 方法
vm[name] = e.target.value;
});
node.value = vm[name]; // 将 data 的值赋给该 node
node.removeAttribute('v-model');
}
};
new Watcher(vm, node, name, 'input');
}
// 节点类型为 text
if (node.nodeType === 3) {
if (reg.test(node.nodeValue)) {
var name = RegExp.$1; // 获取匹配到的字符串
name = name.trim();
new Watcher(vm, node, name, 'text');
}
}
}
附上一副官网流程图: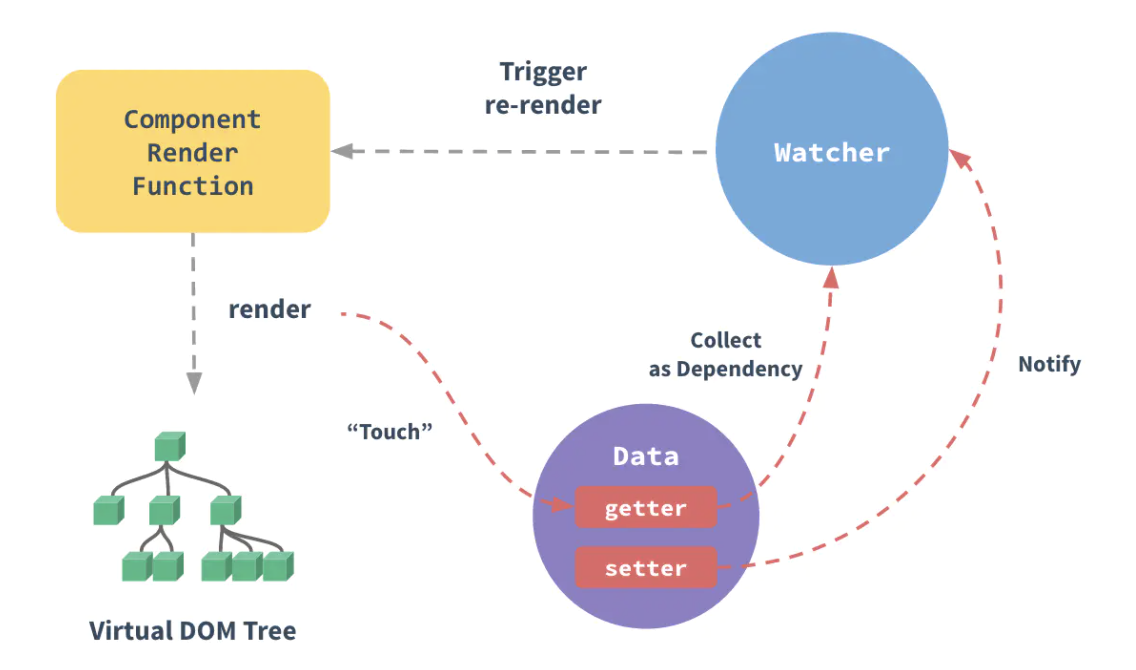
参考: